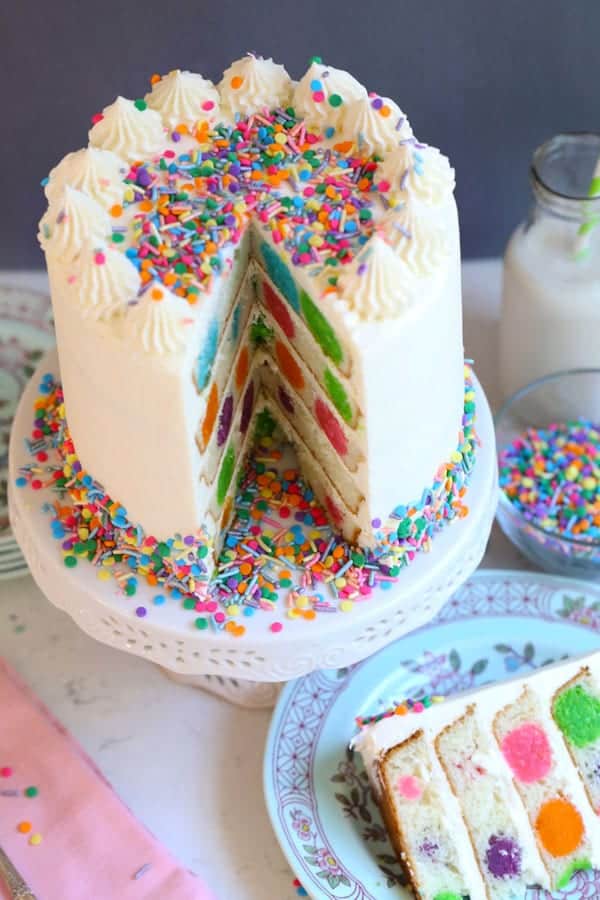
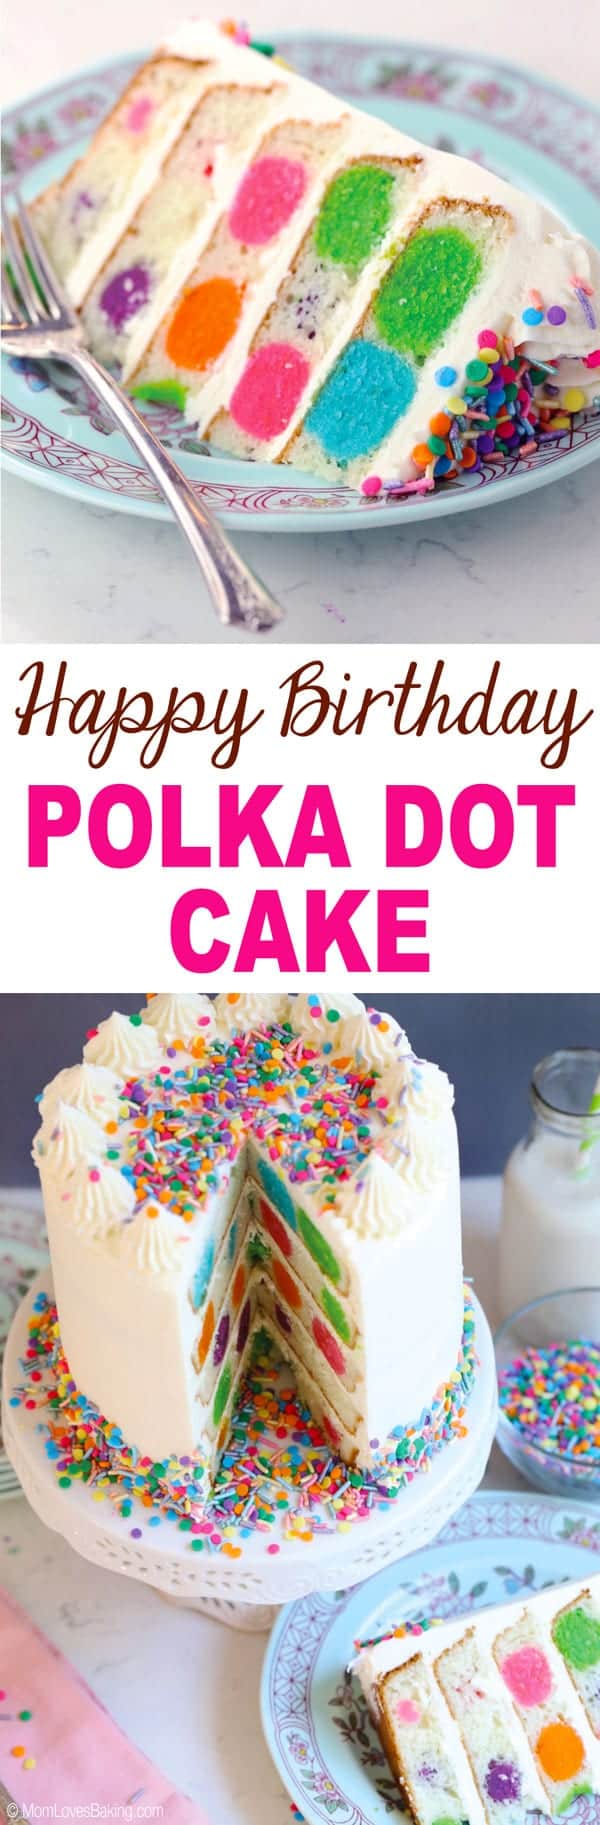
Happy Birthday Polka Dot Cake
Say Happy Birthday with this super cute Polka Dot Cake – a delicious vanilla cake with colored cake balls in the center, frosted with the best vanilla buttercream and decorated with colorful sprinkles.
It was so much fun partnering with Wilton on this cake project. They really loved my Rainbow Sprinkles Polka Dot Surprise Cake, but wanted me to create something with a birthday theme. This Happy Birthday Polka Dot Cake is what I came up with and I think it turned out to be super cute and festive!
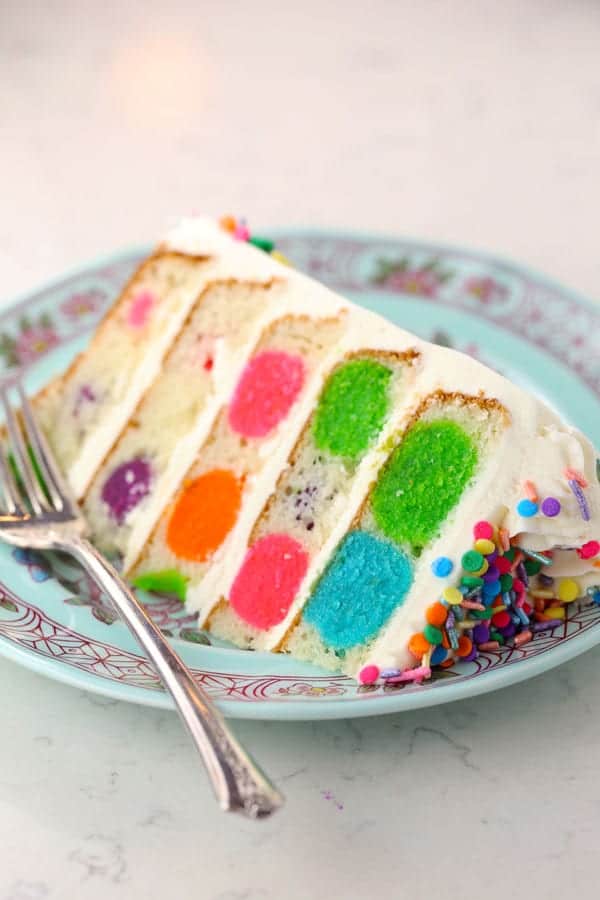
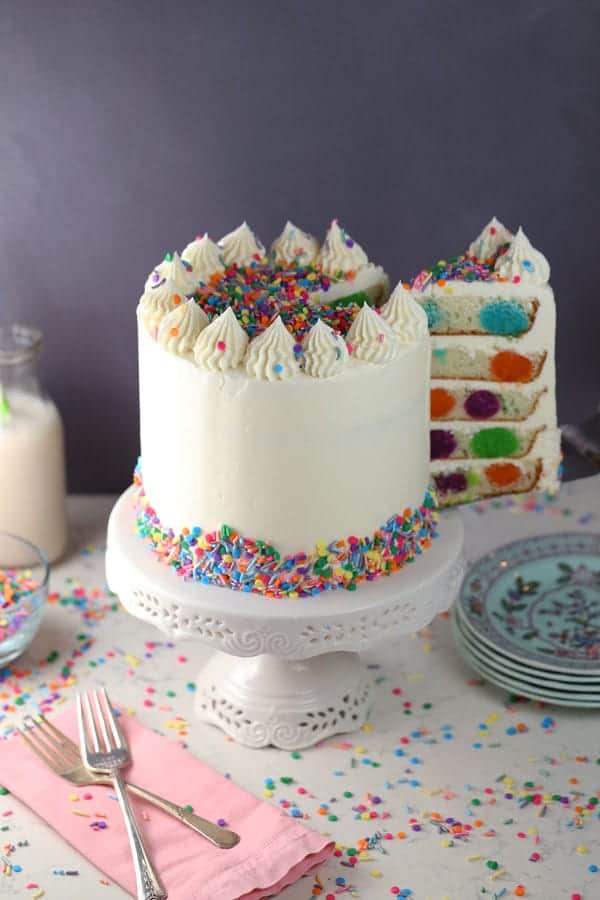
It’s so much fun to cut into a cake that has a surprise pattern on the inside! I especially love the vibrant colors of the polka dots!
I’m a very big fan of Wilton! I graduated from the Wilton Master Cake Decorating course in Chicago back in 1998. It was a 2-week course. I drove all by myself up to Chicago in my little Mazda Miata from Florida to attend the course. I loved every minute of the class! It was all that I’d hoped for and more. It gave me the skills I needed to start my own cake business. And I’m still using what I learned there!
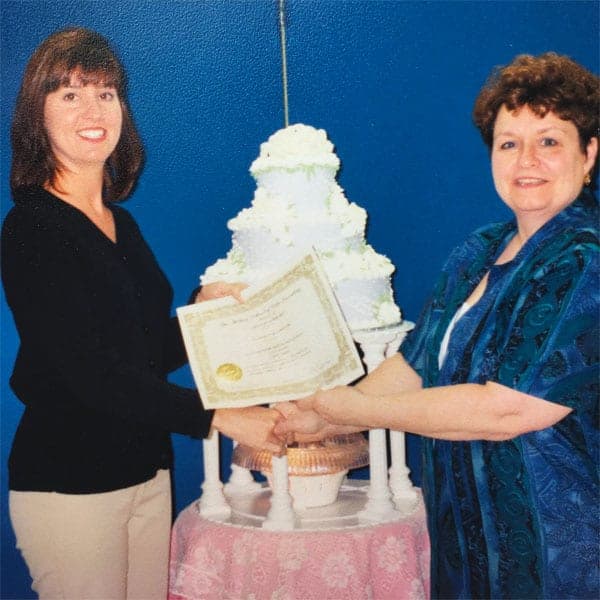
Here I am in the photo above, receiving my diploma from Sandy Folsom for completing the Wilton Master Cake Decorating course (Sandy is currently the director of The Wilton School of Cake Decorating and Confectionery Art – an 85 year tradition of decorating excellence in Darien, IL). Behind me is my final project – a wedding cake (designed by me) made of styrofoam with royal icing decorations. Isn’t it pretty? I was so proud of the cake and actually kept it for several years. I had it on a shelf that finally broke one day and the cake came crashing down to the ground. That was a sad day. My husband had to throw it away for me because I couldn’t do it!
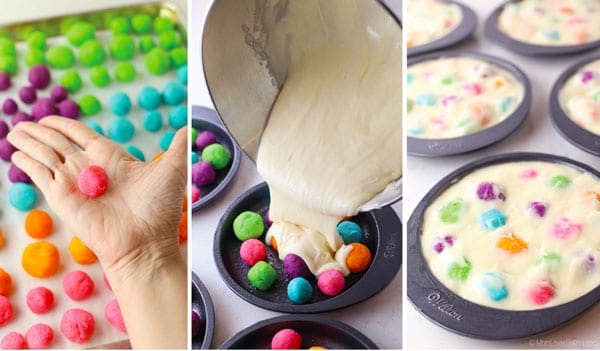
How to Make the Polka Dot Cake Balls
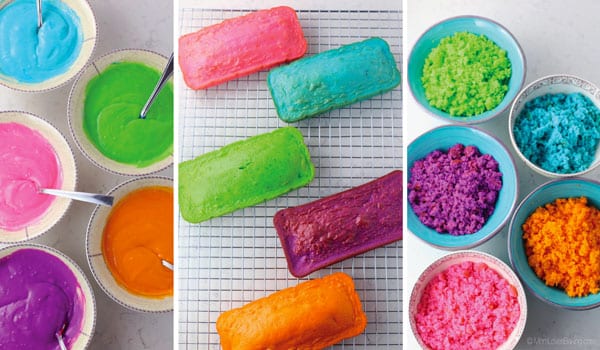
The first step in making this Happy Birthday Polka Dot Cake is to create the “polka dots” or cake balls. Prepare a cake mix according to the package instructions, then separate batter into 5 bowls. Color the batter as desired. I used the Wilton Color Right food coloring. Pour each color into an 8″x3.5″ loaf pan that’s been greased with cooking spray. Bake at 350°F for 20 minutes. Let cool. Crumble cake into 5 separate bowls. Meanwhile, prepare your buttercream frosting (recipe below). Add 1/3 cup of frosting to each bowl of crumbs. Stir to combine.
How to make happy birthday polka dot cake
Shape the cake and frosting mixture into balls that are about 3/4″ thick. Grease your cake pans with cooking spray. I used the Wilton Easy Layers pans. It is a set of 5 pans that our 6 inches wide. Place about 15 cake balls in the bottom of each pan. Then prepare another white cake mix according to package instructions and pour over cake balls. Bake the cakes for 20 minutes on 350°F. Let cool.
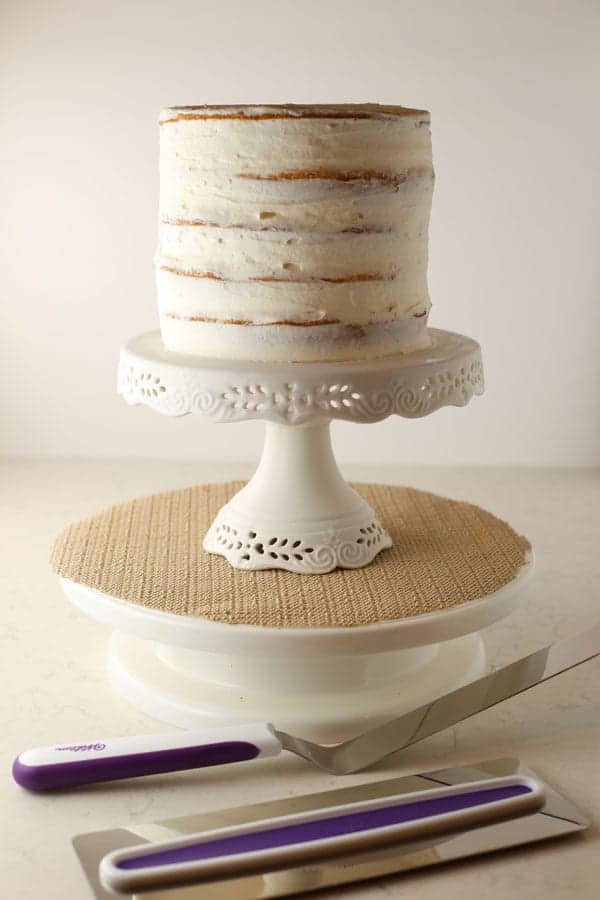
Filling and frosting the cake
Use a knife to slice off the domed tops of each cake. Fill and frost the cakes with a thin layer of frosting. Refrigerate for a couple of hours. Then frost the cake with a smooth finish. I used the Wilton Angled Spatula and the Wilton Icing Smoother to frost the cake.
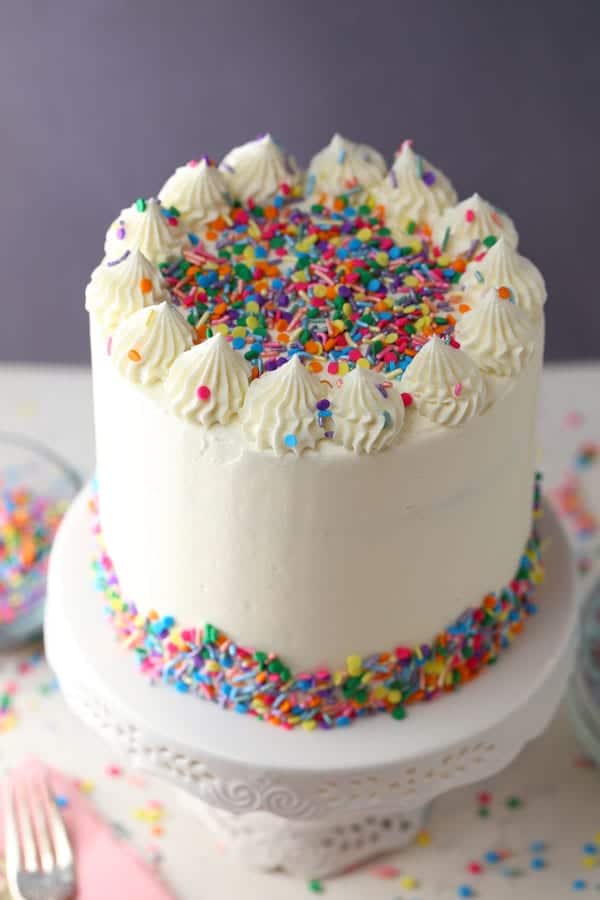
How to pipe frosting on the birthday cake
Then I used a Wilton Disposable Pastry Bag fitted with a Wilton #4B Pastry Tip to pipe buttercream onto the top of the cake. I used Wilton Blooming Colors Sprinkles to decorate the cake.
Do you have a birthday coming up or do you need to make a birthday cake for someone special soon? I highly recommend this super cute Happy Birthday Polka Dot Cake!
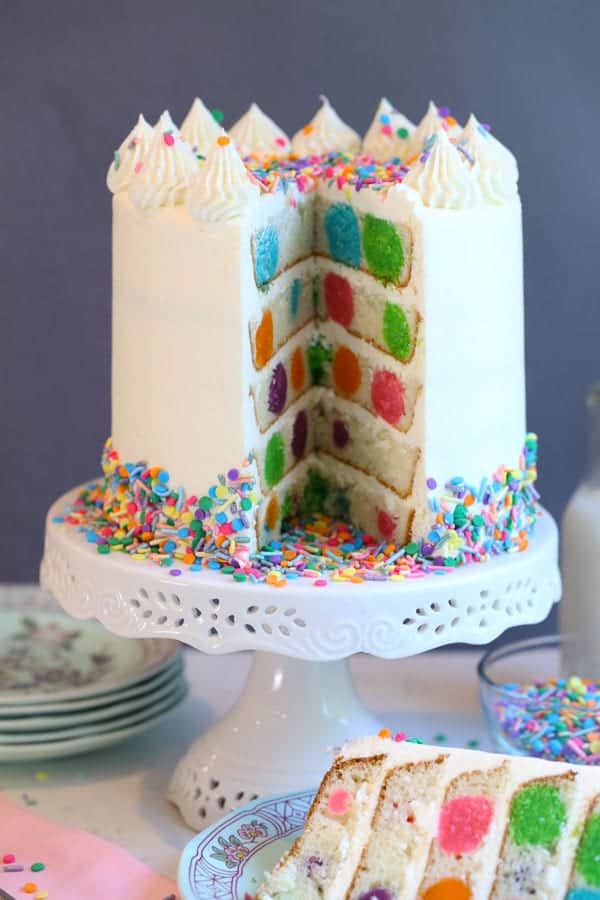
Impress your guests when it’s time to cut the cake! You are sure to get lots of oohs and ahhs when you cut into this baby!
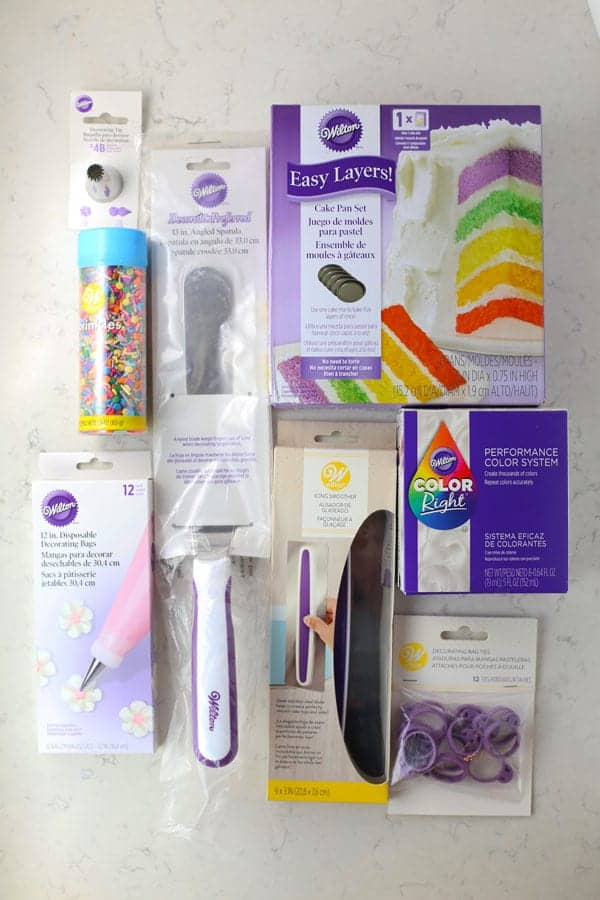
Here are all of the Wilton products I used for this Happy Birthday Polka Dot Cake!
Find the recipe for this cake below. Let me know if you try it. Post a photo on Instagram and tag @momlovesbaking ! I love to see what you make from my blog!
Enjoy and Happy Birthday!
Want even more? Subscribe to Mom Loves Baking to get new recipes and a newsletter delivered to your inbox. And stay in touch on Facebook, Pinterest, Twitter, and Instagram for all my latest updates. If you make this recipe, share a photo on social media tagging @momlovesbaking and using the hashtag #momlovesbaking.

Happy Birthday Polka Dot Cake
Ingredients
For the cake balls
- 1 box white cake mix, prepare batter according to package instructions - see below for baking instructions
- food coloring, I used Wilton
- 2 cups buttercream frosting, recipe follows
For the cake
- 1 box white cake mix, prepare batter according to package instructions - see below for baking instructions
For the frosting
- 2 cups unsalted butter, softened to room temperature
- 8 cups powdered sugar
- 1/2 cup heavy cream
- 2 teaspoons vanilla extract
- sprinkles, I used Wilton
Instructions
For the cake balls
- Prepare the cake batter according to package instructions. Divide batter into 5 bowls. Put a few drops or more of food coloring in each bowl and stir (I used Wilton Performance Color System). Pour into small, greased pans. I used aluminum foil loaf pans (8"x3.5"). Bake in a preheated 350°F oven for about 20 minutes or until a toothpick inserted in middle comes out clean. Let cool. Crumble cake into 5 separate bowls. Stir in a generous 1/3 cup of frosting into each bowl (recipe follows). Stir well. Form into balls and place on a cookie sheet. Refrigerate for 1-2 hours.
For the cake
- Preheat oven to 350°F. Grease 5 (6-inch) round cake pans with non-stick cooking spray (I used Wilton Easy Layers cake pans which are non-stick). Place about 15 chilled cake balls in each pan. (You will have some leftover balls which you can store in the refrigerator in a sealed container for eating later.) Pour about 1 cup of batter into each of the prepared pans and distribute batter evenly. Add a little more, if needed. Bake in preheated oven for 20 minutes or until a toothpick stuck in the middle of the cake comes out clean. Let cool.
For the frosting
- Beat softened butter on medium speed with an electric or stand mixer. Beat for 3 minutes until smooth and creamy. Add powdered sugar, cream, and vanilla extract with the mixer running on low. Increase to high speed and beat for 3 minutes. Note: If the frosting is too thick, you can add a little more cream. Just add one tablespoon at a time, then mix thoroughly until you get the consistency you like.
To decorate
- Use a knife to slice off the domed tops of each cake (you can save and eat later). Fill and frost the cakes with a thin layer of frosting. Refrigerate for a couple of hours. Then frost the cake with a smooth finish. I used the Wilton Angled Spatula and the Wilton Icing Smoother to frost the cake. I used the Wilton Disposable Pastry Bag fitted with a Wilton #4B Pastry Tip to pipe buttercream onto the top of the cake. I used Wilton Sprinkles to decorate the cake. Slice and enjoy. To get 24 servings, slice cake into 12 pieces (like cutting a pie). Then cut each of the 12 pieces in half since each slice is very tall. Store leftover cake in the refrigerator, covered, for up to a week. It tastes the best in the first few days.
Video
Did you make this recipe?
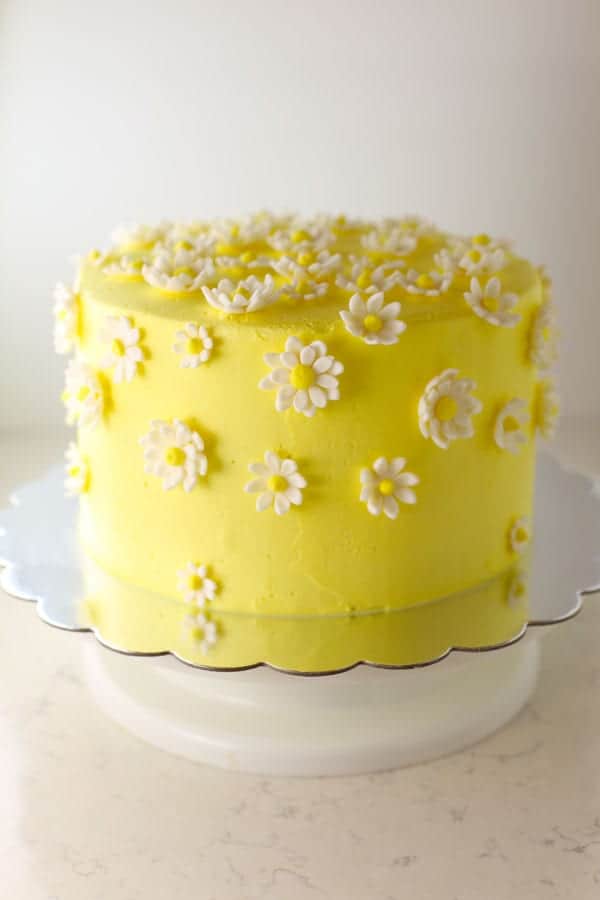
Please let us know by leaving a star rating and review!You might also like this Rainbow Tie Dye Surprise Daisy Cake
Or maybe you would like this Chocolate Drizzled Semi-Naked Rose Cake

Or if your special someone can’t have gluten or dairy, make them the Best Gluten-Free, Dairy-Free Chocolate Cake

All text and images © Lise Ode for Mom Loves Baking. Please do not use my images without prior permission. If you want to republish this recipe, please re-write the recipe in your own words, or link back to this post for the recipe. Disclaimer: Nutrition information shown is not guaranteed to be accurate. This post may contain affiliate links.
@ 1st I was like how in the world did u get such nice round circles… (I have baked an American Flag, & a few checkerboard, Zebra, red, white & Blue cakes b4. (Can u guess 1 of my kids was born on July 4th weekend!) But never a Pokeadot cake. This looks soo good & e-z. Thanku 4 sharing.
Such an elegant cake with more surprises inside!
So cute! I love polka dots.
I remember when you went to the master class in 1998. You showed us pictures, and I was awed!
Awww, so sweet! 🙂