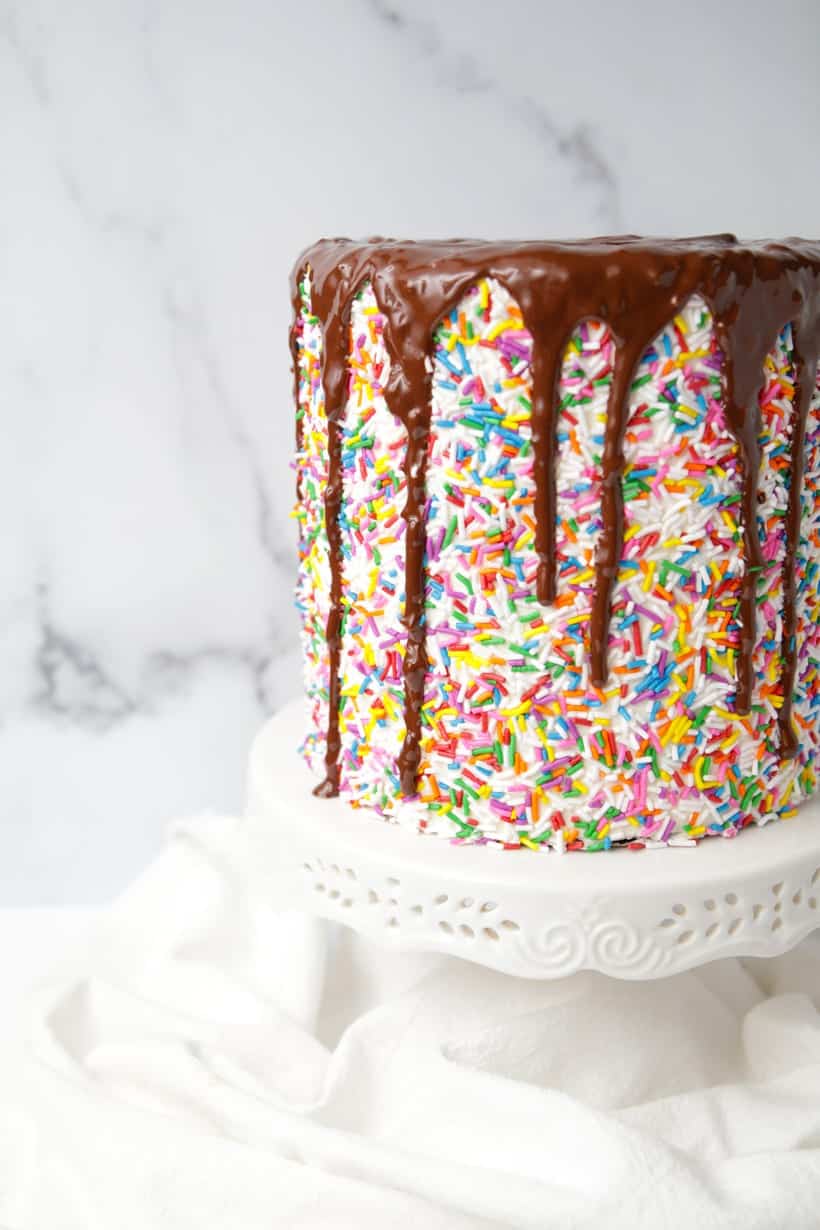
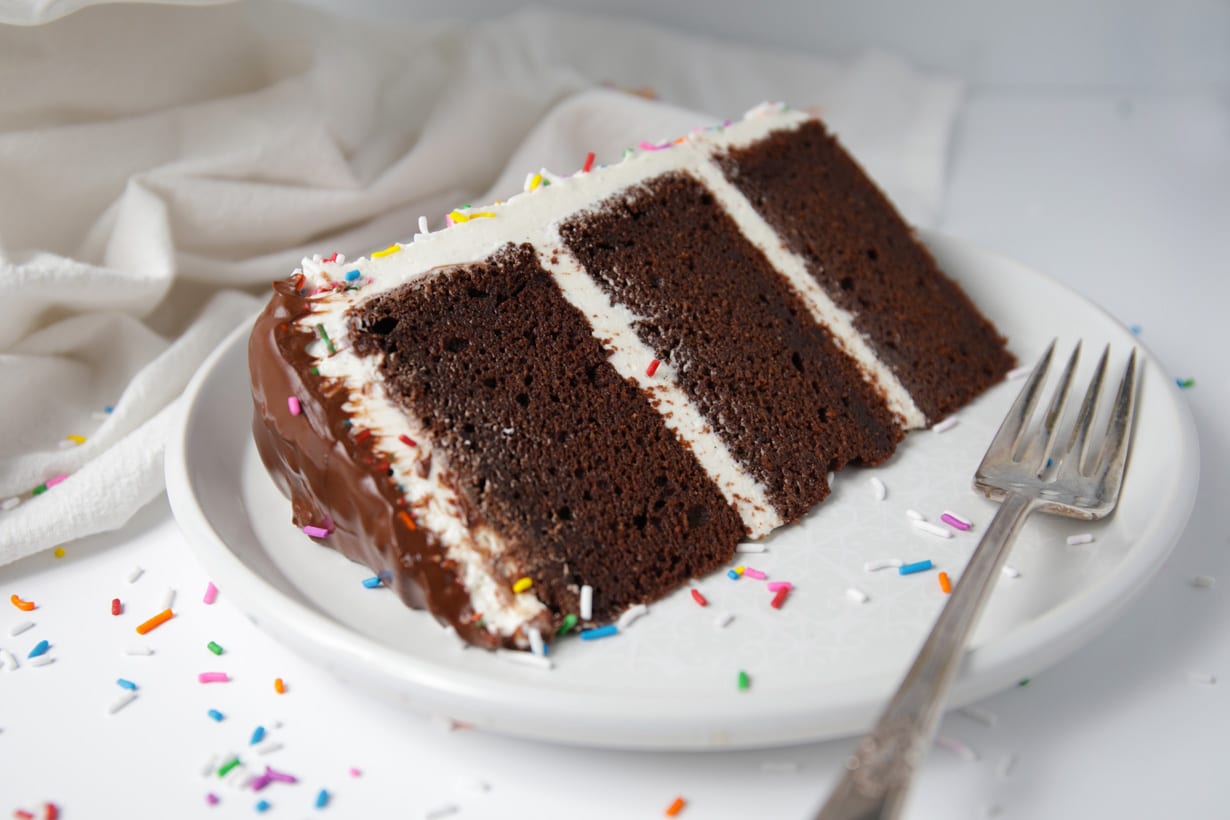
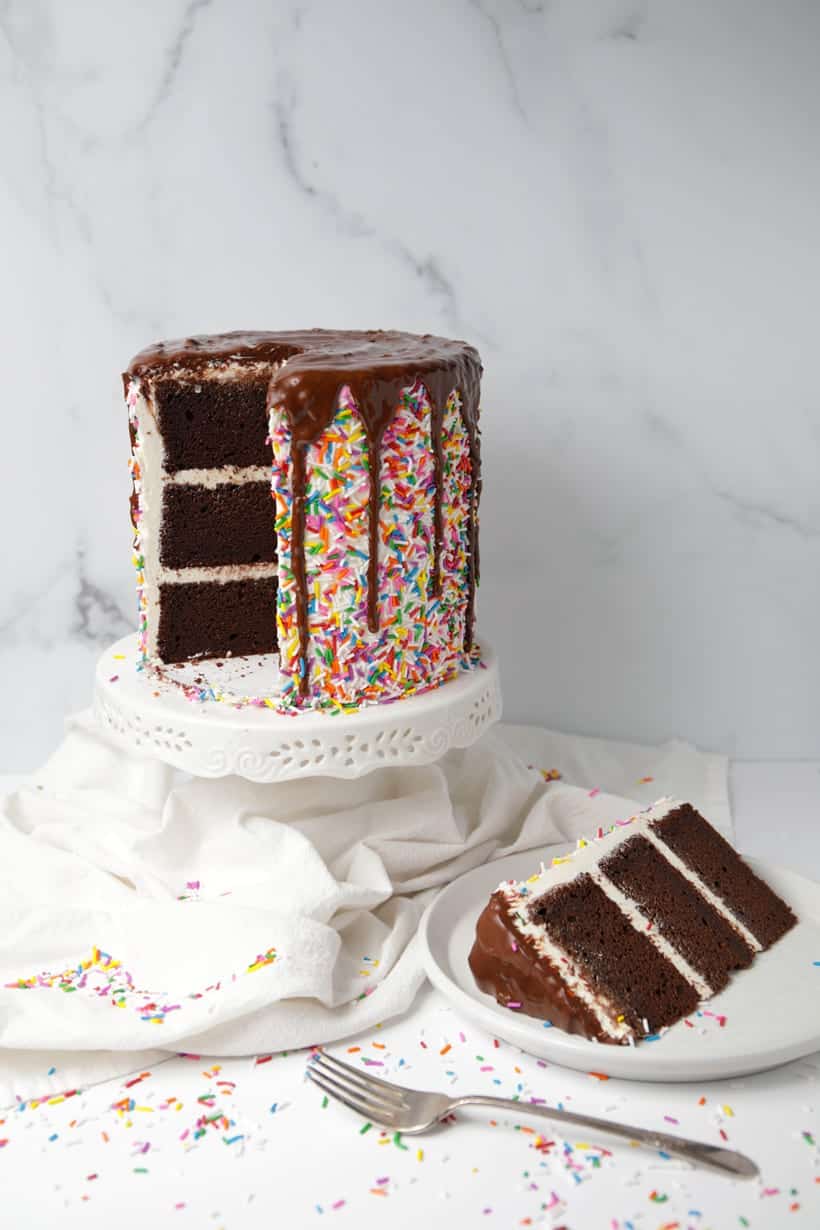
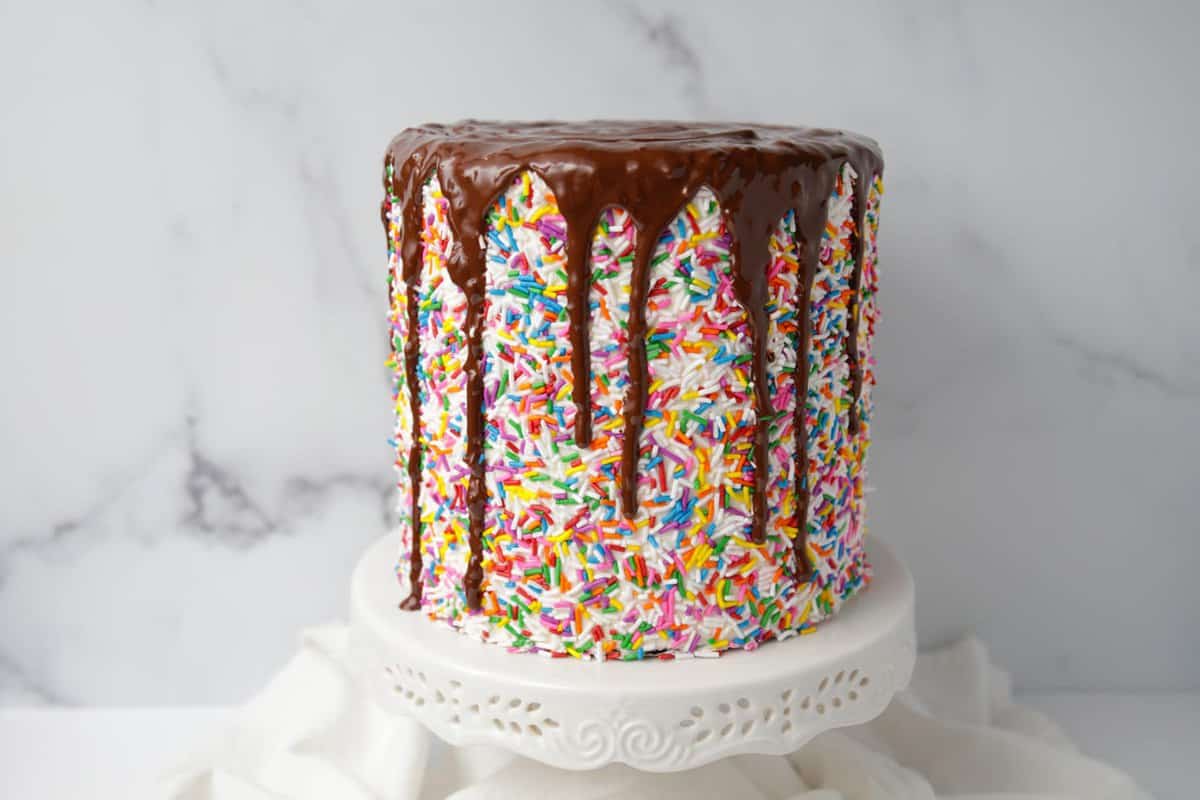
This is the best gluten free Rainbow Sprinkles Chocolate Drip Cake! Three layers of perfectly moist chocolate cake, filled and frosted with vanilla bean buttercream, then rolled in rainbow sprinkles and drizzled with chocolate ganache. It's completely irresistible and perfect for a birthday party! (Shhhh... no one will know it's gluten free. I fooled my son and husband.)
Your family and friends will love this Rainbow Sprinkles Chocolate Drip Cake. Such a fun dessert, and SO delicious! We love special occasion desserts, like my Pink Painted Buttercream Cake (made with a gluten free cake mix) or if you want a classic chocolate cake with FULL gluten, try Aunt Emily's Chocolate Fudge Cake. This is one of my CAKE recipes you’ll definitely want in your collection.
Our daughter, Savannah, graduated from high school this week, so it seemed like the perfect time to make a Rainbow Sprinkles Chocolate Drip Cake. How is it possible that 18 years can fly by so fast? We can't believe that our little girl will be going off to college in just two short months.
She's gotten to go to a lot of graduation parties over the last few weeks, but she can never eat the cake at someone else's party because they are NEVER gluten free. It makes me so happy when my daughter is happy and gluten free cake makes her happy! So I'd like to dedicate this cake recipe to her. Happy graduation, Savannah!
How to make a Rainbow Sprinkles Chocolate Drip Cake
This is just an overview, the full recipe is towards the bottom of this post.
- Line three 6-inch round pans with parchment paper. Spray with non-stick cooking spray. Set aside.
- Mix up the cake batter. This recipe is so easy because you can mix up the gluten free cake batter by hand in one big bowl. No electric mixer is needed for this cake recipe. (Note: I used my Homemade Gluten Free Flour Blend.)
- Pour batter into prepared pans. Divide the batter equally into the 3 prepared pans.
- Bake the cakes. Place your filled cake pans into a preheated 350°F oven for 45-50 minutes or until a toothpick inserted in the center comes out clean.
- Let the cakes cool. Once they’re done baking, remove the pan from the oven and let the cakes completely cool before inverting the pan onto a wire cooling rack.
- Make the buttercream. Follow the recipe below to whip up a batch of vanilla bean buttercream. The secret ingredient is Nielsen-Massey Pure Vanilla Bean Paste!
- Fill and frost the cooled cakes. Place in refrigerator to chill for an hour.
- Roll chilled cake in sprinkles using an extra cake board on top, then place cake on stand, remove top board and add more sprinkles to top of cake. (Note: I used Fancy Sprinkles, use my code MOMLOVESBAKING15 to get 15% off)
- Chocolate ganache. Follow the instructions below to make the chocolate ganache to drizzle over your sprinkles cake.
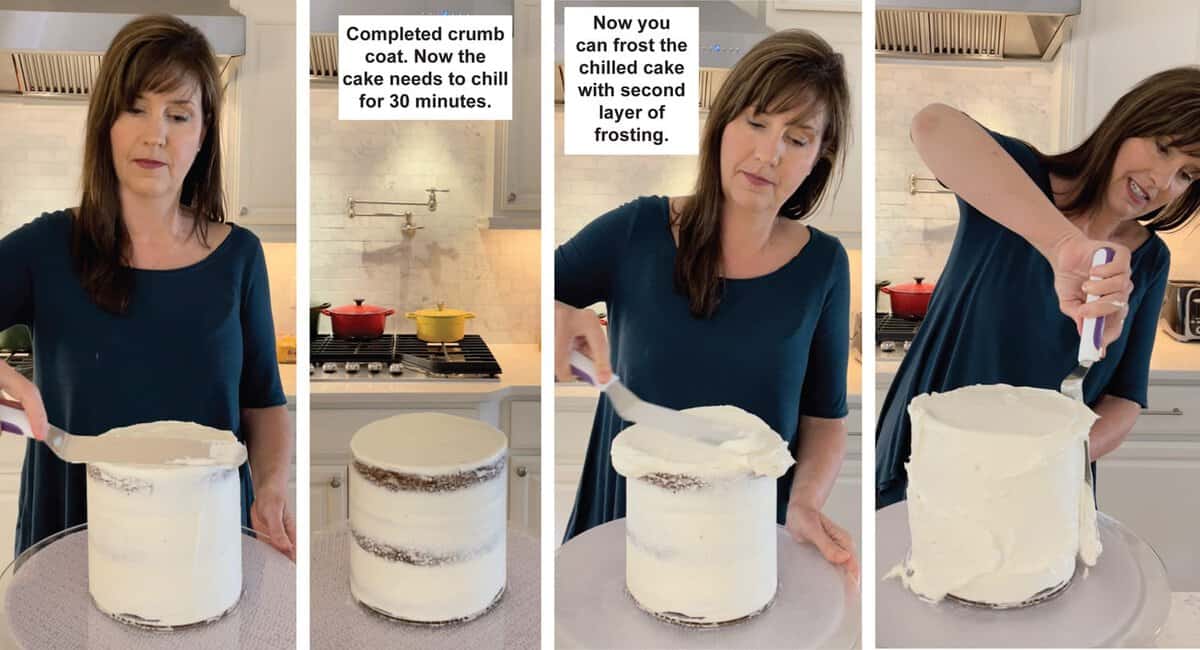
How to Fill and Frost Cake with a Crumb Coat
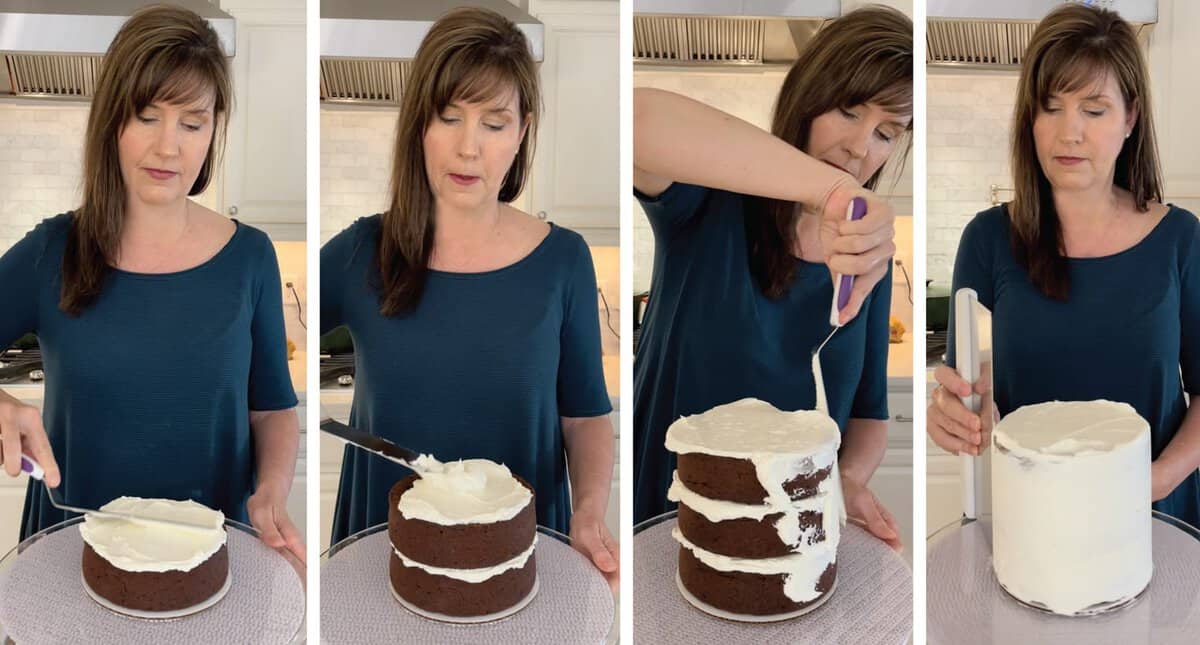
• Place first cake layer onto a 6" round cake board. Make sure it's secured on a revolving cake stand with a non-slip material such as Duck Brand Easy Grip Shelf Liner. I cut it into a 6-inch round to fit underneath the cake board.
• Spread a ¼" thick slather of frosting onto the first cake layer using an offset spatula. Repeat process with the next two layers. Continue spreading frosting around the sides of cake with a thin layer.
• Using a pastry dough bench scraper, drag along the side of the cake while revolving the cake stand to achieve a smooth finish. Scrape excess frosting back into the frosting bowl.
• Finish the top edges by gently scraping excess frosting from the outer edges of the cake inwards towards the middle. (See photo below for the finished crumb coat stage.) Place cake in fridge to chill for 30 minutes.
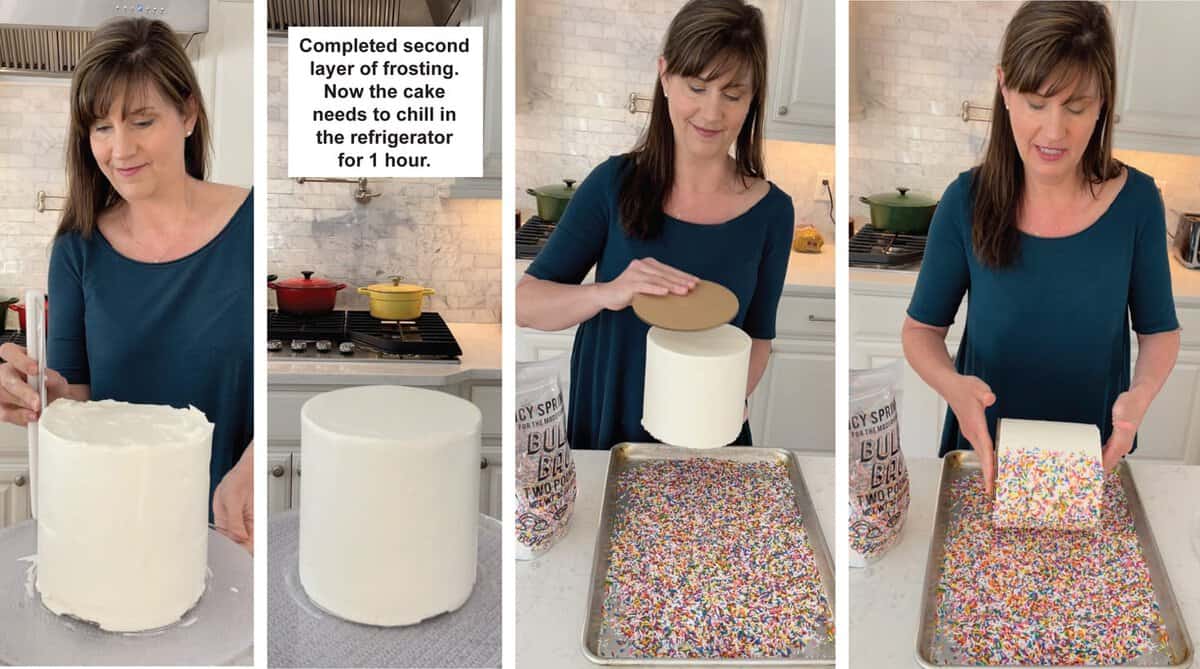
Creating a smooth finish on your cake
• Take chilled cake out of the fridge. Place onto revolving cake stand again with the non-slip material underneath. Add another coating of frosting (about ¼") using an offset spatula to spread it around as evenly as possible.
• Next, use a pastry dough bench scraper to drag along the side of the cake as you rotate the cake stand towards your body. Finish the top edges by gently scraping excess frosting from the outer edges of the cake inwards towards the middle.
• Place cake in refrigerator to chill for an hour.
How to Cover a Cake in Sprinkles
• Pour about 4 cups of sprinkles onto a half sheet pan with raised edges. I used Rainbow Crunchy Jimmies by Fancy Sprinkles, available in a 2 pound bag. (Use my code MOMLOVESBAKING15 to get 15% off.)
• Take chilled cake out of fridge. Place another 6-inch cake board on top. Pick up cake with one hand on each side and roll into sprinkles like a big rolling pin. Keep rolling until completely covered.
• Place cake onto a serving plate or cake stand. Then place that plate or cake stand onto the sheet pan. Remove top cake board and add more sprinkles to the top with your hand or with a spoon.
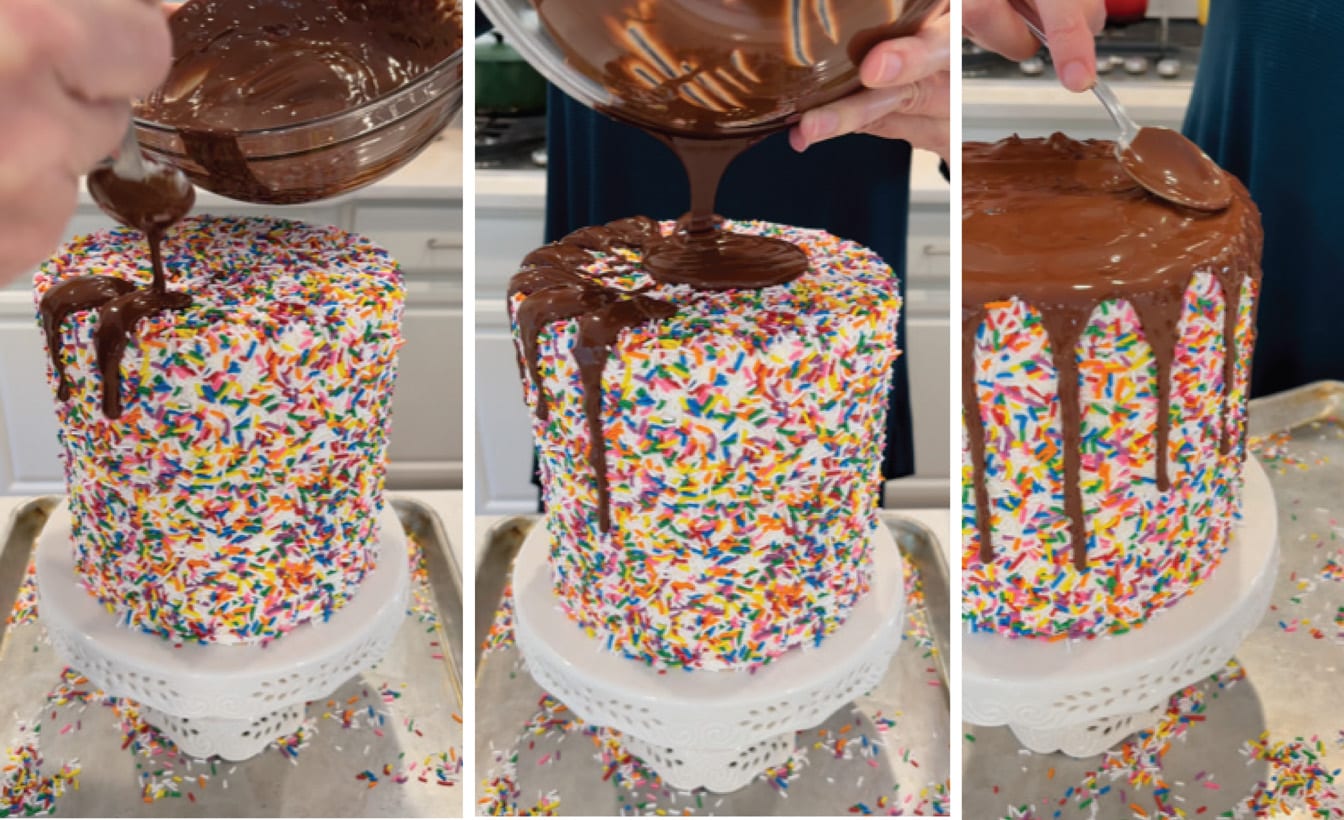
To finish the cake, make the chocolate ganache (recipe follows). Immediately drizzle down the top edge of cake using a spoon. Pour remaining ganache and spread around with a spoon or angled spatula. Work quickly as it will cool and harden slightly.
Helpful Hints
• Room Temperature Ingredients – for best results, always use room temperature ingredients for most baking projects. Chilled ingredients mix differently and affect the consistency of the recipe.
• Parchment Paper – if you want to make sure the cakes do not stick to the pan, cut 10 parchment paper circles to fit the pans. Spray non-stick cooking spray before and after placing the parchment paper. If you’re in a hurry, try using Baker’s Joy non-stick cooking spray and spray it generously on the pans before adding cake batter.
• Tools - using the proper cake decorating tools is extremely helpful in creating a cake that looks like the photos here. If you plan on doing more cake projects like this, I highly recommend investing in a few tools such as a revolving cake stand, angled spatula (13-inch) and a pastry dough bench scraper. These tools will make it much easier for you to achieve a smooth frosted cake. Find links to these items below.
Storage Instructions
• This cake tastes best served at room temperature and when it is the most fresh, up to two days.
• After you fill and frost the cake, cover in sprinkles and drizzle with ganache, you might want to let the chocolate set before slicing.
• Store leftover cake covered in the refrigerator for up to 3-5 days. Let it come to room temperature before serving.
Tools for success
Measuring Cups and Measuring Spoons
Nielsen-Massey Pure Vanilla Bean Paste
Wilton 6-Inch Round Cake Boards
Pastry Dough Bench Scraper - Set of 2
Wilton Angled Spatula 13", 13-inch
Nordic Ware Baker's Half Sheet Pan - Set of 2
Note: The above items are affiliate links. As an Amazon Associate I earn from qualifying purchases.
Want even more? Stay in touch on Facebook, Pinterest, Twitter, and Instagram for all my latest updates. If you make this recipe, share a photo on social media tagging @momlovesbaking and using the hashtag #momlovesbaking.
Rainbow Sprinkles Chocolate Drip Cake
Ingredients
For the chocolate cake layers
- 3 cups gluten free flour blend, recipe on my blog or 420g (You could also use store bought such as Bob's Red Mill 1 to 1 Gluten Free Baking Flour.)
- 1 ½ cups unsweetened cocoa powder or 130g
- 2 cups granulated sugar or 400g
- 1 teaspoon baking powder
- ½ teaspoon baking soda
- 1 ½ teaspoons salt
- 4 large eggs, room temperature
- 1 cup canola oil (or your favorite oil)
- 1 ½ cups unsweetened coconut milk, stirred well (from the can)
- 1 ½ cups water, room temperature
- 4 teaspoons vanilla bean paste (or pure vanilla extract)
For the vanilla bean buttercream
- 4 sticks unsalted butter, softened (or 2 cups/16 ounces)
- 4 cups powdered sugar (or 16 ounces)
- 2 teaspoons vanilla bean paste (or pure vanilla extract)
- 3 tablespoons unsweetened coconut milk (from the can)
- 3 pinches salt
For the sprinkles
- 4 cups sprinkles (I used Rainbow Crunchy Jimmies by Fancy Sprinkles. Use code MOMLOVESBAKING15 for 15% off)
For the chocolate ganache
- 1 cup semi-sweet chocolate chips (I used Nestle brand)
- 2 tablespoons extra virgin olive oil (or a little more if it's too thick)
Instructions
For the chocolate cake layers
- Preheat oven to 350°F. Line three 6-inch round cake pans with parchment paper and spray with non-stick cooking spray. Set aside.
- In a large bowl, whisk together the gluten free flour, cocoa powder, sugar, baking powder, baking soda and salt. Set aside. (Note: For best results, weigh the flour, cocoa and sugar to get exact measurements.)
- Next you will add the wet ingredients. For the coconut milk, open the can and pour into a medium bowl. Whisk until creamy, then measure out 1 ½ cups and add to the dry ingredients along with the water, eggs and vanilla bean paste. Stir together until completely combined and batter is smooth.
- Pour batter into prepared pans and bake for 45-50 minutes or until a toothpick inserted in cake comes out clean. Remove from oven and let the cakes cool completely.
For the vanilla bean buttercream
- Beat the butter with an electric mixer until creamy. Gradually add the powdered sugar, vanilla bean paste, coconut milk and salt. Once the ingredients are combined, turn mixer up to medium and beat until smooth and creamy. Frost cake as directed below. (Note: You will probably have some extra frosting which you can store in an airtight container in the refrigerator for up to 2 weeks.)
Assembling the cake
- Cut the dome shaped tops of the cakes off so that they are level. Place first layer on a 6-inch round cake board and place that onto a rotating cake stand. I use Duck Brand drawer liner to keep it from sliding (you can cut a small round piece to put under the 6-inch cake board). Using an angled spatula, spread the first layer of cake with about ¼ inch of frosting. Add the second layer and repeat. Add the third layer, then frost the top and sides of cake with a crumb coat. Use a pastry dough bench scraper to drag along the side of the cake as you turn the revolving stand to create the smooth finish. Let chill in the refrigerator for 30 minutes. Add the final coat of frosting. Frost the cake smooth and return to refrigerator for about an hour.
For the sprinkles
- Pour a generous amount of sprinkles onto a half sheet pan (with raised edges). Take the chilled cake, holding with your left hand and place another 6-inch cake board on top with your right hand. Then, holding both sides of cake, roll into sprinkles like a rolling pin. Place cake on cake stand, then add more sprinkles on top. OR if you want a really smooth top section, leave off the top sprinkles.
For the chocolate ganache
- Place chocolate chips in a microwave safe bowl and microwave on high for 20 seconds. Stir. Microwave for another 20 seconds and stir until smooth and completely melted. Stir in olive oil. Heat for another 10 seconds, if needed, but be careful not to burn the chocolate chips. If it seems too thick, add a little more oil until it flows easily when drizzling.
Serving suggestions
- Let the chocolate set before serving, about 30 minutes to an hour. This cake tastes the best at room temperature and up to two days. You can store it covered in the refrigerator for another few days, but make sure to let it come to room temperature before serving.
Notes
Nutrition
You might also like:
Easy Rainbow Buttercream Cupcakes
Rainbow Sprinkle Sugar Cookies
Rainbow Sprinkles Polka Dot Surprise Cake
All text and images © Lise Ode for Mom Loves Baking. Please do not use my images without prior permission. If you want to republish this recipe, please re-write the recipe in your own words, or link back to this post for the recipe. Disclaimer: Nutrition information shown is not guaranteed to be accurate. This post may contain affiliate links.

Ralph @ Bakell Edible Glitter says
love the look of the sprinkles on the outside! normally ganache drippy cakes seem to have a smooth exterior, but i think the bit of texture adds so much more depth and interest.
Liz says
You make it look so easy!! I'm pinning so I can refer back to this even for my most basic frosting challenges!
Lise Ode says
You can do it, Liz!!! And I want to see pictures! xo